RLM Cloud Command Descriptions
The following sections describe the commands available in each tab of the RLM Cloud user interface. Note that all tabs are not available for every user (for example, only a user with administration privilege can see the Admin tab). The tabs are listed in the order they appear in the UI, ie, alphabetical order with the exception of Admin and About which appear on the far-right-hand side.
Dashboard Tab
The Dashboard Tab allows you to monitor and operate on any of your license servers. This form opens with a list of all your license servers. From here you can perform the following operations:
Display server machine uptime and disk statistics
Reread/restart RLM and all ISV servers on a server machine
Shutdown RLM and all ISV servers on a server machine
View current usage (if the server is running)
View server statistics (if the server is running)
Configure the server
Edit options for the server
Shutdown or reread/restart one customer’s server
View license status

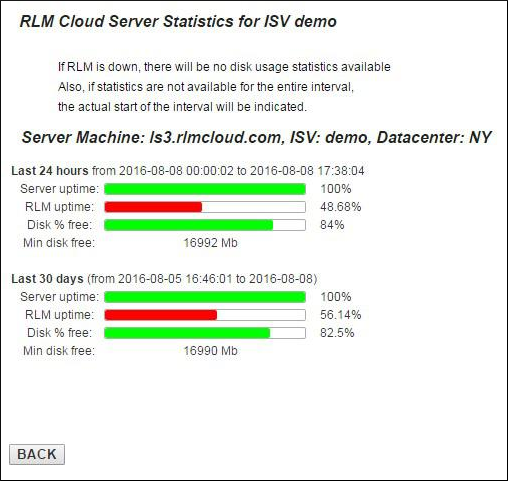
The first button Display Server Uptime Stats, will display a page of uptime and disk usage statistics for the past day, month, and year for your server machine(s). Some of those statistics may not be available if your server has not been running that long.
When the dashboard is displayed, the status might not be completely up-to-date (this is done to avoid overloading the server with status requests). Press the Update Server Status button at the bottom to cause the license servers update their status, then Refresh Display to display the up-to-date status.
If you have failover servers enabled, the dashboard expands to show the status of both the primary and failover servers:
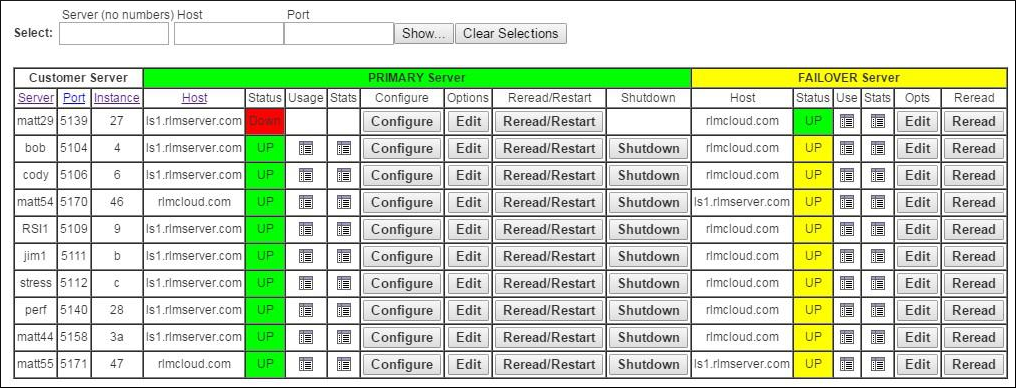
In this example, we have shut down the primary server for “matt29”, and the failover server has taken over license service. Failover servers in yellow are running but not serving any licenses.
The buttons in the Usage column will display license usage for that server. The usage includes the version and expiration date of each license pool. Note that if multiple licenses were combined by the server to create a pool, the earliest expiration date will be shown. So, for example, if one license expires on 1-mar-2023, another expires on 1-dec-2024, and a third is permanent, the display will show 1-mar-2023 as the expiration date until 2-mar-2023. At that point, it will display 1-dec-2024 until 2-dec-2024, at which point it will display “permanent”.
The server statistics page will appear similar to this one, for our “demo” server:
Customers Tab
All License Servers and licenses in the RLM Cloud are associated with a Customer. RLM Cloud allows you to maintain a customer list and associate customer contacts with license servers in your RLM Cloud. (Note: if you choose to not store customer contacts in RLM Cloud, the special contact “[none]” will be used.)
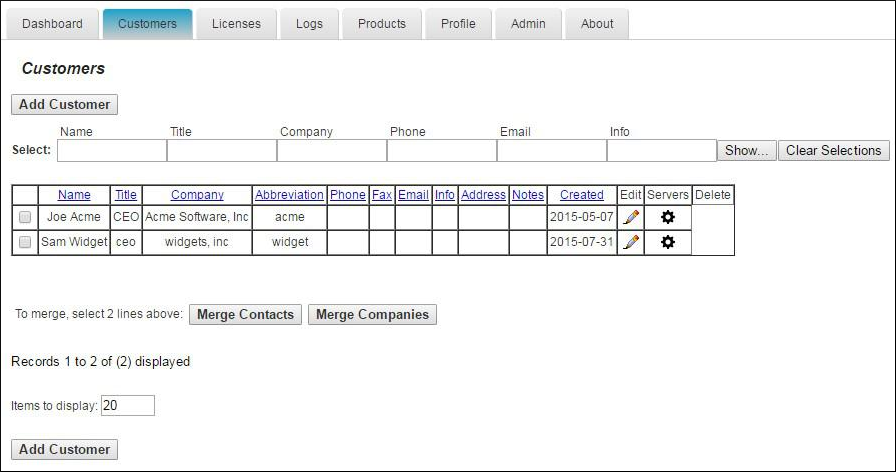
You manage customers by selecting the Customers tab, as shown here:
Editing Customer Information
You can edit individual contacts with the edit button on the right. If the contact is not associated with any provisioned company, pressing the delete button will confirm that you want to delete the contact. If you delete the last contact for a company, you will be prompted to delete the company record itself.
Merging Customers
If you have 2 contacts who represent the same person, or 2 companies which are the same, you can check the check-boxes at the beginning of the 2 lines, then press Merge Contacts or Merge Companies, as appropriate. You must select exactly 2 customers for the merge operation. Once you press the Merge… button, you will be prompted to select which of the 2 should remain after the merge operation.
A merge of contacts will update any server or user record which referred to the old contact to then refer to the new (surviving) contact. For a merge of companies, any contact associated with the old company will now be associated with the surviving company.
Once the merge is complete, in the case of Merge Companies, the other company will be deleted, and all data in the company record will be lost. For the case of contacts, you will be prompted as to whether you want to delete the contact or not. If you delete it, all information in that contact record will be lost.
Creating New Customers
To create a new contact/customer, press the Add Customer button at the top or bottom of the screen. When you press the Add Customer button, the Add New Customer form appears:
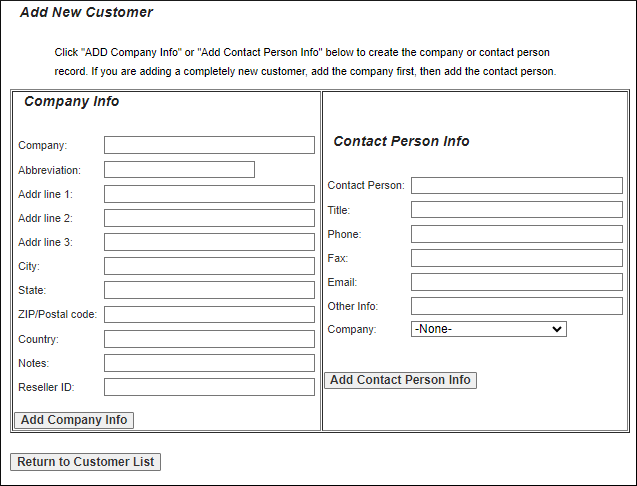
Since everything in the RLM Cloud is based on Customers, you will need to add a company for each customer, even if that customer is an individual. After creating the company (and optionally any contacts), the list is displayed, as above.
On the right-hand side of the list, there are three icons for Edit  , Servers
  , and Delete
  .
.
If the contact is associated with provisioned servers, the delete icon will not appear. Clicking the Servers icon for any contact in the company will allow you to either initially provision license servers or edit the license server provisioning parameters for that contact (and hence the company). This means you can use department names as the contact name if you want to track servers by company department as opposed to individual employees.
You can control the number of customers displayed by changing the Items to display count at the bottom of the screen. You can also filter the list by entering text in the Select: text boxes at the top of the screen. If the list is longer than the number of items to display, RLM Cloud will display a pagination box at the end of the list.
License Server Provisioning
When you click the Servers icon, a list of provisioned license servers for this contact will be displayed, along with a Provision New Server Instance… button and a Back to Customer List button. In this screen, you can:
Edit server parameters using the Edit
icon. Edit allows you to change the password for
the licenses on this server. If you have multiple license server machines, edit also allows
you to move the license server to a different server machine. Finally, edit allows you to
change the contact associated with this server.Edit the configuration of the license server using the Config
icon which allows you
to move the server to a different server machine, add/delete/edit licenses for the server,
write the license file to the server machine, or perform a reread on the server.Delete the server, which will shut down the server and remove all licenses and log files.
Provision additional license servers for this company (additional servers will be named “company2”, “company3”, etc.
Once you have provisioned a company’s license servers and added licenses, you can then move the
licenses to the server and start the license server for that customer using the Config
icon in the server list. A sample server configuration screen is shown here:
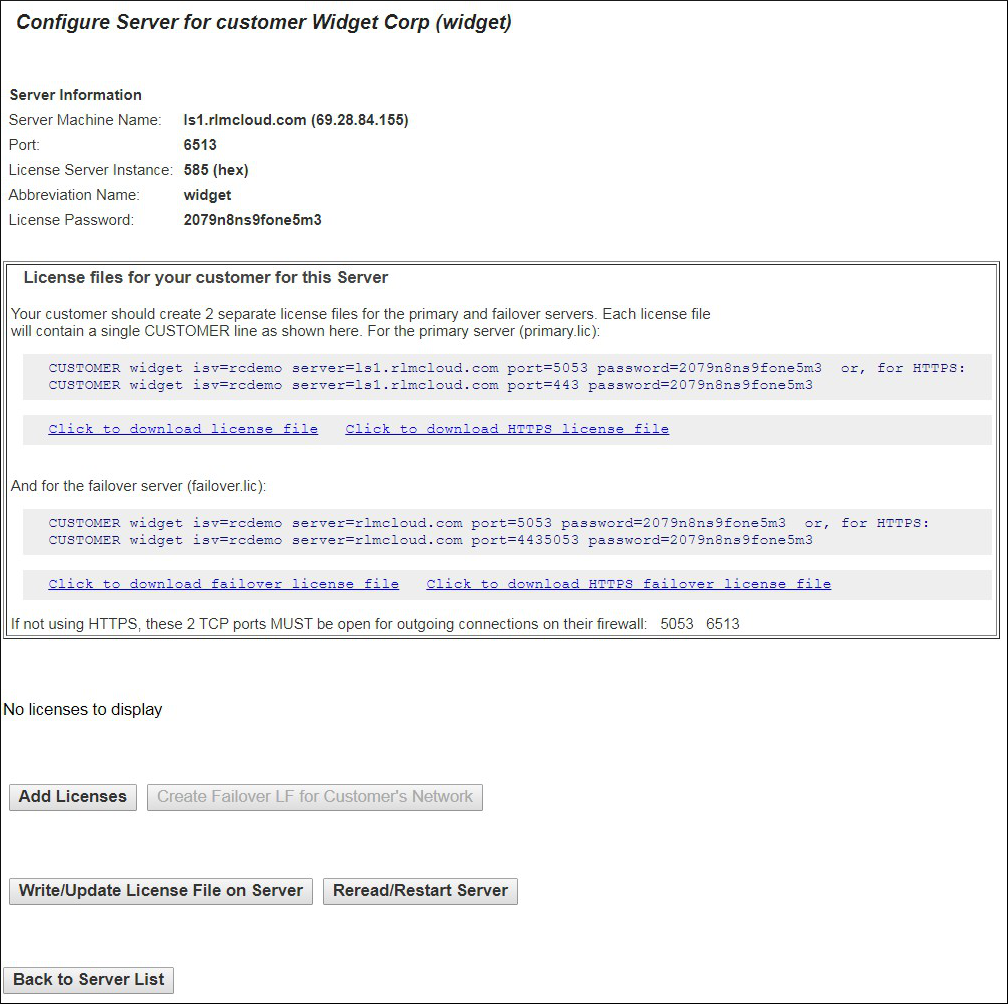
Items to note in this configuration screen:
This server is provisioned with a failover server, so there are 2 sets of CUSTOMER lines, one for the primary and one for the failover servers.
There are CUSTOMER lines for both the standard RLM communications protocol as well as for HTTPS transport (your application must be RLM v14.0 or later, and be built with HTTPS support to utilize HTTPS transport – see Using RLM with HTTPS).
There are 6 buttons at the bottom area, plus a “Back” button:
Add Licenses - this allows you to add licenses to this server.
View/Edit/Delete Licenses - this allows you to do license maintenance on this server.
Create Failover LF for Customer’s Network - this is greyed out in the example, because a failover server is present. However, if you do not have a failover server configured, this allows you to create a failover license file for your customer’s network, if desired.
Write/Update License File on Server - this creates any provisioned licenses and pushes them to the license server (and does a reread).
Reread/Restart Server - this performs a reread on the license server.
DISABLE server - this disables the customer’s license server. Unlike shutting down a server, a disabled server will not restart when a reread is done on the server machine. This is useful if a customer has not paid, but you do not want to delete their server configuration.
When a server is disabled, it appears in the dashboard status greyed out with the word “Disabled” displayed, as shown:

Also, when disabled, the bottom section of the configuration page changes to include an “ENABLE server” button, as shown here:
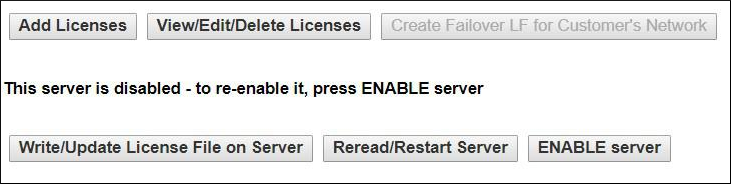
When you re-enable a server, occasionally you will need to do a Reread/Restart at the top of the dashboard to get the server running again, depending on the server state. Rarely, you might need to do a Shutdown followed by a Reread/Restart.
In the configuration screen of a license server, you will see the Add Licenses button at the bottom left. Pressing this button brings up the “Create License” screen, as shown below:
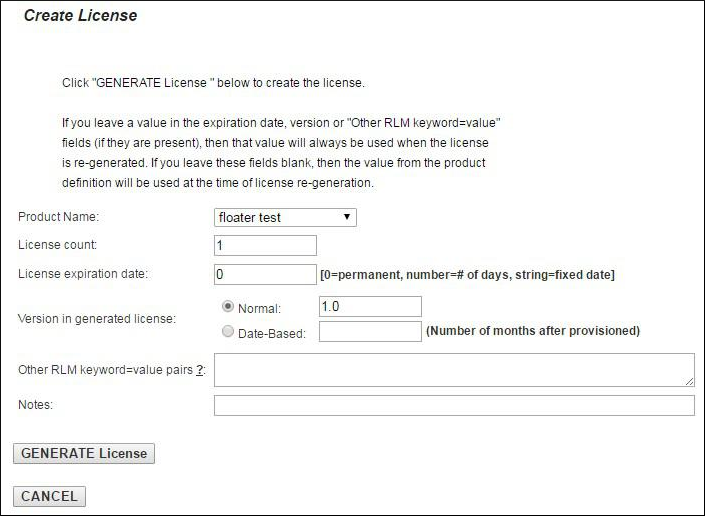
In this screen, you can select the license parameters based on product definitions you created earlier. Note that the values of License Expiration Date, Product Version, and Other RLM keyword=value pairs will be populated from the corresponding values in the product definition you select at the top of the form. These 3 fields may or may not be present in the form, depending on the settings for Hide version, Hide exp date and Hide misc data in the product definition itself.
IMPORTANT NOTE:
If any of the 3 fields (version, expiration, misc data) are present, they will be populated from the data in the product definition, but this means that the data in the form will ALWAYS be used when a license is regenerated. On the other hand, if the fields are not present (because they were hidden) or if you clear the contents of the field before you generate the license, the then-current values from the product definition will be used on a license regeneration.
What does this mean practically? Well, let’s say you create a product definition with a version of 1.0 and hide the version, then you create licenses for 100 customers using this product definition. If you hide the version in the license generation screen, then sometime later you want to upgrade all those customers to version 2.0, all you have to do is edit the product definition to specify version 2.0, and regenerate all the licenses (which you can do with Admin → Server Machines → Refresh all on …).
On the other hand, if you specified the version in the license generation screen, updating the product definition’s version will have no effect when you regenerate the license. This might be what you want or not; there are good reasons for doing it either way.
Once you are satisfied with the form, press GENERATE License, then back on the configuration screen, select Write/Update License File on Server from the bottom of the form so that the licenses will be written to the server machine. Write/Update License File also does a reread on the server so that your licenses are ready to use.
Licenses Tab
The licenses tab allows you to view or edit licenses for any or all customers. You can filter the
list of licenses using the select boxes at the top of the page. When the Configure Server page
is displayed in the Customers tab, the View/Edit/Delete Licenses button brings up the
Licenses tab with that particular server’s licenses pre-selected. This is the licenses tab for a
particular server (note the selection boxes filled in at the top). When the licenses tab is entered
from the Configure Server page, there will be an extra “replace” icon ( ) on the
far-right-hand side of the page. Clicking this icon allows you to delete the license from that line
and replace it with a new license.
) on the
far-right-hand side of the page. Clicking this icon allows you to delete the license from that line
and replace it with a new license.
Note
This icon DOES NOT appear if the Licenses tab is selected directly.
If there are any metered or named user licenses in the list, the form will look like this:
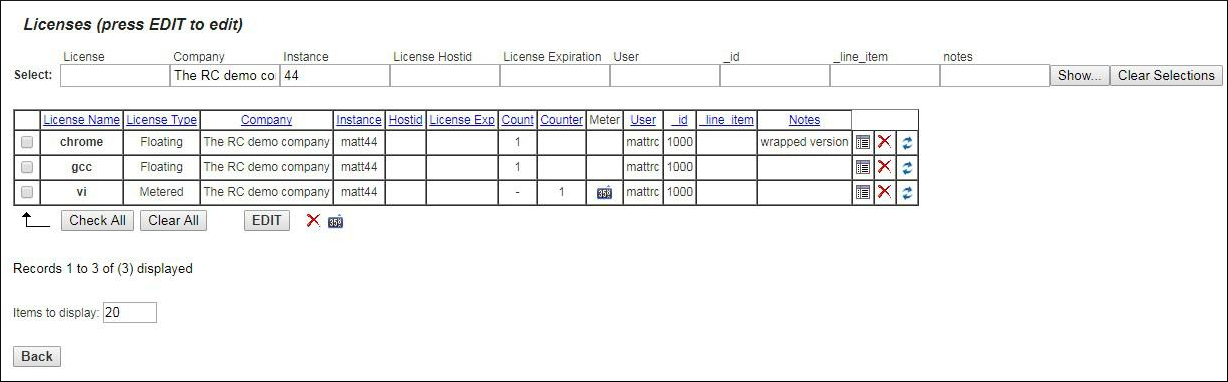
Note the addition of the Counter and Meter columns, plus the meter icon ( ) at the
bottom near the delete icon, as well as the Named User column for named user licenses.
) at the
bottom near the delete icon, as well as the Named User column for named user licenses.
Metered Licenses
You can press the meter icon on any individual line to get to the meter editing form for that counter, or you can click on Check All and press the meter icon at the bottom which will give you the meter editing form for all metered licenses on the page displayed.
The meter editing page looks like this (for a single counter):
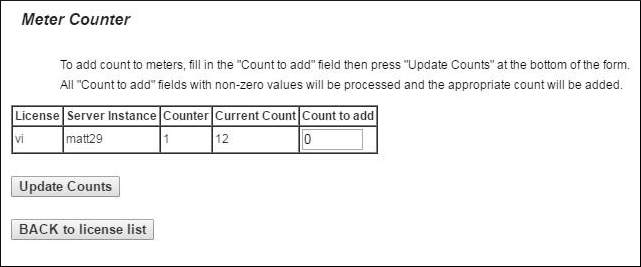
To add count to one or more meters, fill in the Count to add field on the right-hand side,then press Update Counts. All meter counters with non-zero Count to Add fields will have the specified count added. Pressing BACK to license list will not affect any meter count.
An important note about meters and meter counters
Meter counters are specific to an individual license server instance. This means that you can specify the meter counter in the product definition, and that same counter number will work for all your customers. In other words, each customer will have their own copy of the meter counter with their own individualized counts.
Named User Licenses
When a license has the Named User option selected, an additional Named User column will appear on the license list. A named user license will be indicated by an asterisk (*) in this field. If the minimum number of hours before a user can be deleted from this list is set, it will appear as “* #” where # is the number of hours before they can be deleted.
Named user licenses will have their user list built dynamically by the license server as users check out licenses. Once the total number of named users equals the number of licenses, no new users will be able to check out a license.
Managing the Named User List
The named user list is managed via the dashboard. Select the Dashboard tab, and press the
Usage icon ( ) for the server you want to manage. When you press Show Users for a
named-user license, the Edit Named User List button will appear on the far right-hand-side, as
shown below:
) for the server you want to manage. When you press Show Users for a
named-user license, the Edit Named User List button will appear on the far right-hand-side, as
shown below:
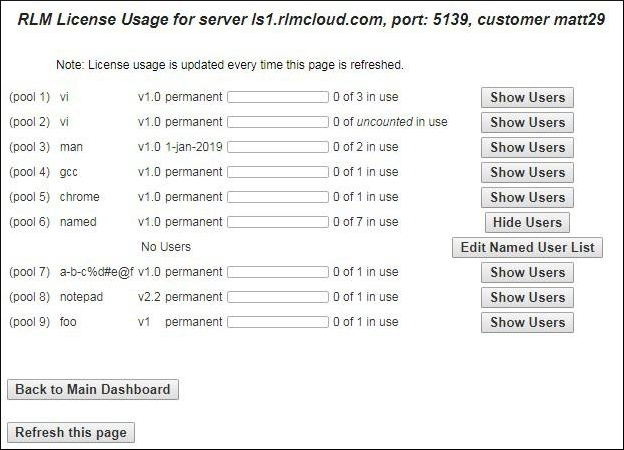
Pressing the Edit Named User List button displays the Edit Named User page, as shown on the right here:
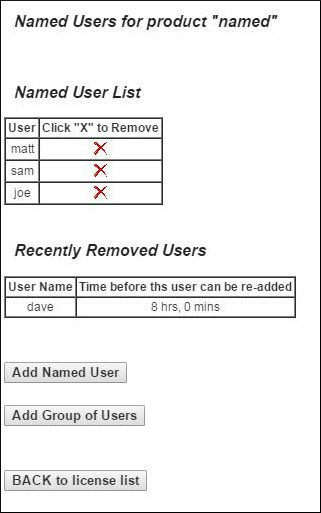
In this case, user “dave” has been removed and cannot be re-added to the list for another 8 hours. To add a user to the list, press the Add Named User button at the bottom. If you have a GROUP defined in your server’s options file, you can add all the users from the group by pressing the Add Group of Users button. Pressing the BACK to license list button will display the form shown above.
Logs Tab
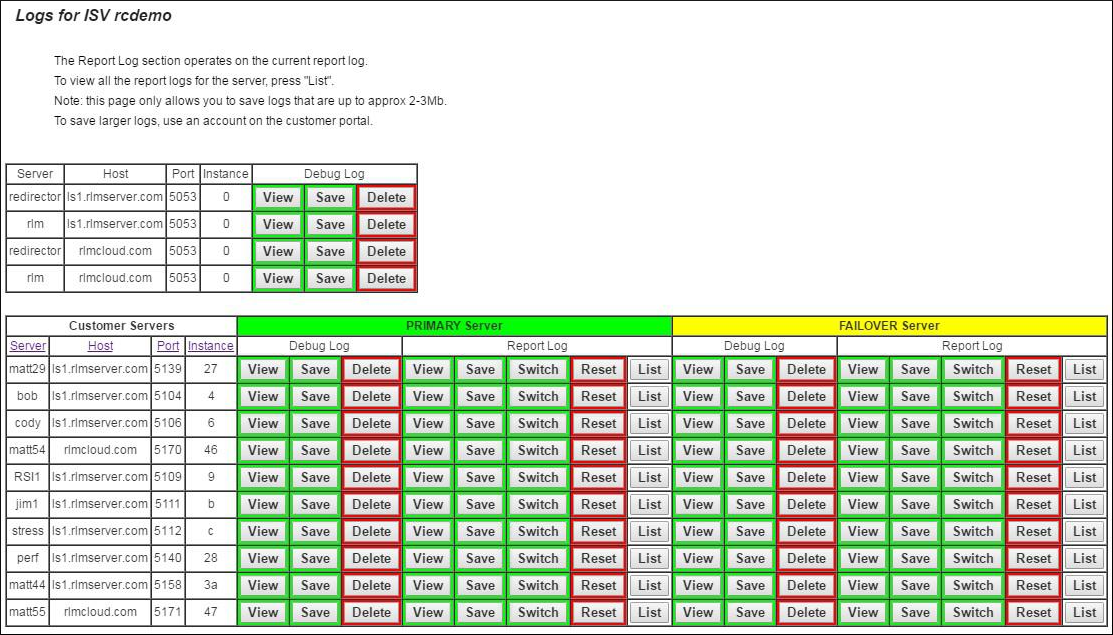
The Logs tab allows you to view the debug and report logs from their license servers. Since the software is not running on the license server node itself, downloads of the report logs will not include the entire file – if you want the entire file, you must download it on the customer portal.
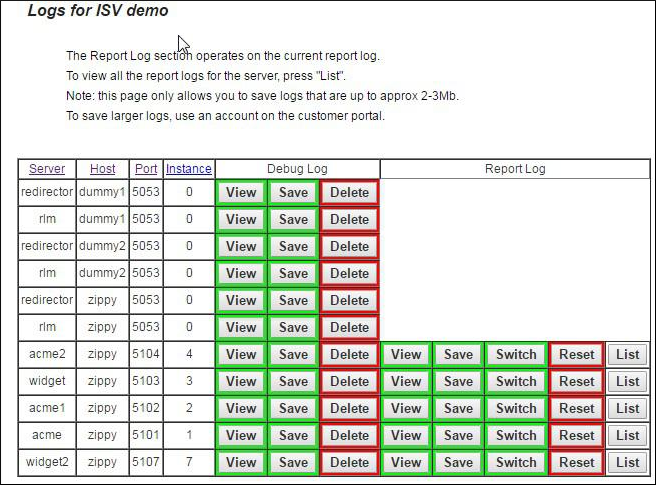
If you have failover servers enabled, the RLM and redirector lines are separated and the form now allows you to view log files from both the primary and failover servers:
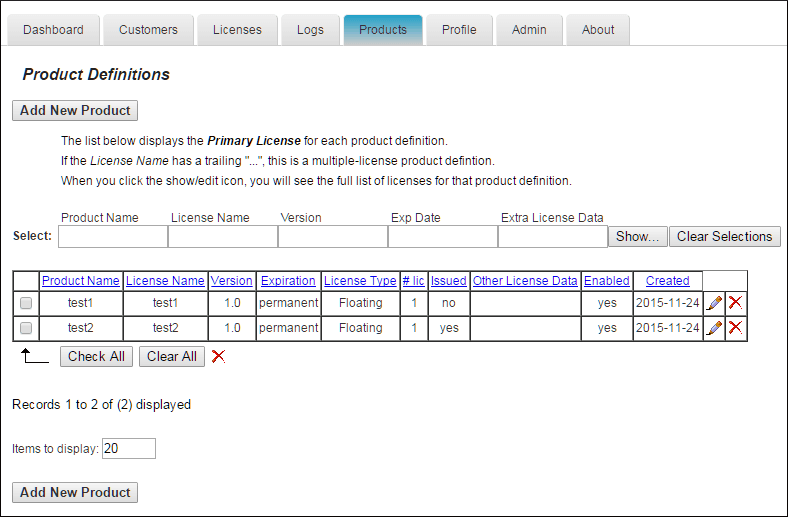
Products Tab
All licenses in RLM Cloud are created from templates called product definitions. Viewing, Editing, and Creating new product definitions is done in the Products tab, as shown here. When you press the Products tab, you will see a list of product definitions – these are all the product definitions in your RLM Cloud (more on this list later):
At the bottom of the list there are 2 buttons (Check All and Clear All), and a red X
().
Every product definition which can be deleted (i.e., product definitions with the red X on the right-hand side of the list) will have a checkbox on the left. If you would like to delete multiple product definitions in a single operation, check the boxes corresponding to these products then click the red X at the bottom of the form. Note that you cannot delete a product definition which has any licenses provisioned using it or any product definition that has multiple licenses associated. If a product definition can’t be deleted, you can disable it (by editing it and un-checking the Enabled checkbox), which will not allow any new licenses to be created. To delete a product definition with multiple licenses, edit the product and delete all the non-primary licenses first, then you can delete it in the main product definition screen.
Product Definitions which are disabled (not deleted) will appear in gray in the list, and can be re-enabled later. You cannot create new licenses for a disabled product.
All licenses which you provision for customers in RLM Cloud are generated from product definitions, so you should create at least one product definition first. Product definition allows you to specify a name for the product which is then associated with a license product name, version, and several other license attributes. When you press the Add New Product button, you will see the screen below:
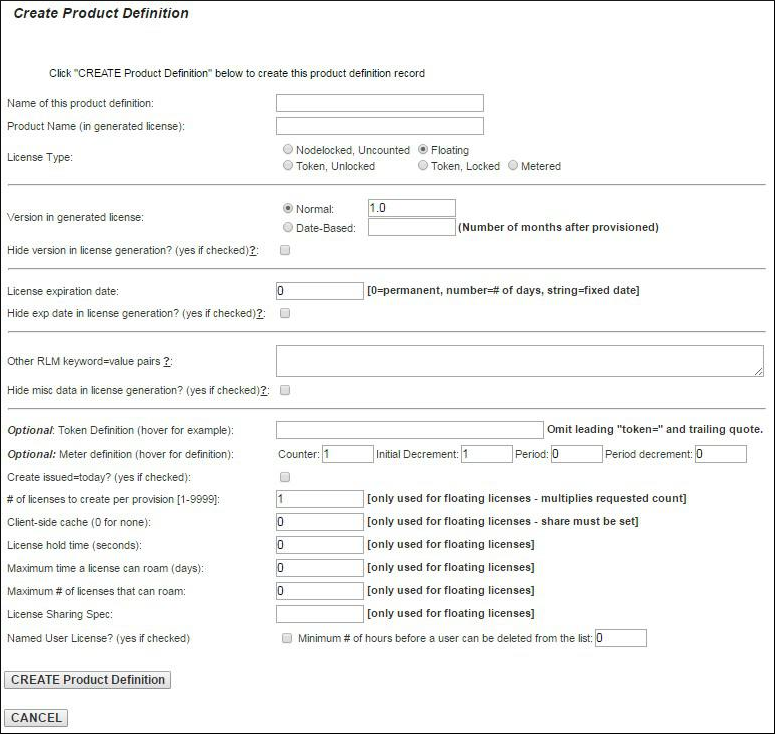
A product definition consists of:
Product definition name
Product (license) name, i.e., what you check out in your application.
License type
Product version
Product expiration specification
Optional RLM keyword=value pairs you specify
A license multiplier (for floating licenses only)
Optional additional attributes for the license
The product definition name is the name used to refer to this product definition. It is not the name of the product license generated by RLM Cloud. This might be something like “Evaluation Office License”, in which case the actual product name might be “Office”.
The product name is the name of the RLM license to be generated. This is the name that appears on the LICENSE line in your RLM license file.
The product version is the version of the product on the generated LICENSE line. If you want to use a fixed product version, click the “Normal” radio button and enter the version number in the text box to the right of that button. This version must be a valid RLM version number, i.e., it must be a number in the format of a floating-point number, of less than 10 total characters. An example valid RLM version is 1.0 or 1000.27
If you want to use a date-based version, click the Date-Based radio button, and enter the number of months after license generation in the text box. A date-based version is of the form YYYY.MM (See “Maintenance-Thru-Date” License for a description of how date-based versions work). So, for example, if you select 9 in the text box and the license is generated in January 2024, the resulting version will be “2024.10”.
In addition, there is a checkbox for Hide version in license generation? (yes if checked)?. If this checkbox is checked, the license version will not appear in the license generation form, and any change you make to the product definition will be propagated to all licenses the next time they are updated on the server. In addition, if your product definition includes more than one license and this box is left unchecked for the primary license, you will be prompted for the product version and all licenses generated will be of that version. So if you want your licenses to have different versions, check the hide version in license generation on the first (primary) license.
The license type controls the type of generated license. Choices are:
Nodelocked, Uncounted
Floating
Token, Unlocked
Token, Locked
Metered
In the case of floating licenses, the requested count is the number of floating licenses generated. For the other license types, the requested count is ignored.
If you select either of the token-based license types, enter the token definition in the Optional: Token Definition” section. This must be a valid RLM token definition enclosed within ‘<’ and ‘>’.
If you select a metered license, enter the metering parameters in the “Optional: Meter definition” boxes. These will default to counter #1 and an initial decrement of 1.
The Create issued=today? checkbox controls whether the generated license contains an issued=today date attribute.
The Number of Licenses to Create per Provision is a multiplier used for floating licenses only. This number is multiplied by the requested count in the provision request to yield the total number of licenses created for this product name. For example, if the provision request is for a count of 7, and the number of licenses to create per provision is 5, the license count for this product name will be 35.
The other license parameters are additional RLM license attributes which will be placed into the generated LICENSE. These must be valid RLM license keyword/value pairs, e.g. “options=professional”. Any options specified at the time of license generation override corresponding attributes in the product definition, thereby allowing you to have default attributes which you modify for a particular customer when you create their license(s). If you want to create a nodelocked license, you can enter the hostid here, e.g. hostid=disksn=1234567890
In addition, there is a checkbox for Hide misc data in license generation? (yes if checked)?. If this checkbox is checked, the optional parameters will not appear in the license generation form, and any change you make to the product definition will be propagated to all licenses the next time they are updated on the server.
The License expiration date controls the expiration date for the generated LICENSE line. This is one of:
0 (or blank) - for a permanent license.
An integer - the number of days from license generation to expiration (i.e., 30 means the license expires 30 days after it is generated).
An actual expiration date, in the form 1-jan-2013 - the actual expiration date, inde pendent of the date of license generation, in the standard RLM expiration date format.
This form also allows you to specify the client-side cache value, license hold time, maximum roam time, max # of licenses that can roam, and sharing.
Once you have created a product definition, the list will be re-displayed, as shown above.
A product definition can specify one or more licenses to be created. The first license you define is called the “Primary License” for this product definition. Once you have created the Primary License, you can add additional licenses by pressing the Edit icon on the right-hand side of this list. More on this later.
Multiple-license product definitions are indicated by the trailing “…” after the Primary License name, as above for the “test”. “multi-license product definition”, “mixed1”, and “mixed2” products.
In addition, there is a checkbox for Hide exp date in license generation? (yes if checked)?. If this checkbox is checked, the license expiration date will not appear in the license generation form, and any change you make to the product definition will be propagated to all licenses the next time they are updated on the server.
Note
For multi-product definitions, if you want the individual products to have different version numbers, expiration dates, and/or misc parameters, you must select the appropriate checkbox for the primary license. Then, that parameter from the product definition for each of the individual licenses will be used. If you don’t select this checkbox, you will be prompted for a (single) value, and this will be used for all licenses for that product.
If any product definition has no associated provisioned licenses created, you can delete it by pressing the red “X” in the far right-hand column. In this example, “another test product” has no provisioned licenses, so it can be deleted. If the product has multiple licenses, it cannot be deleted from this screen. You must first edit the product by clicking on the edit icon, then in that screen, you delete all the licenses other than the primary license. At that point, the product definition can be deleted on this screen by clicking on the red X on the right.
If the version for a product is a date-based version, it will be displayed as “+ N mo.”, where N is the number of months after the license is created.
When you click on the Edit icon (), you will get the browser for that particular product
definition, which allows you to create new licenses for that product as well as editing any of the
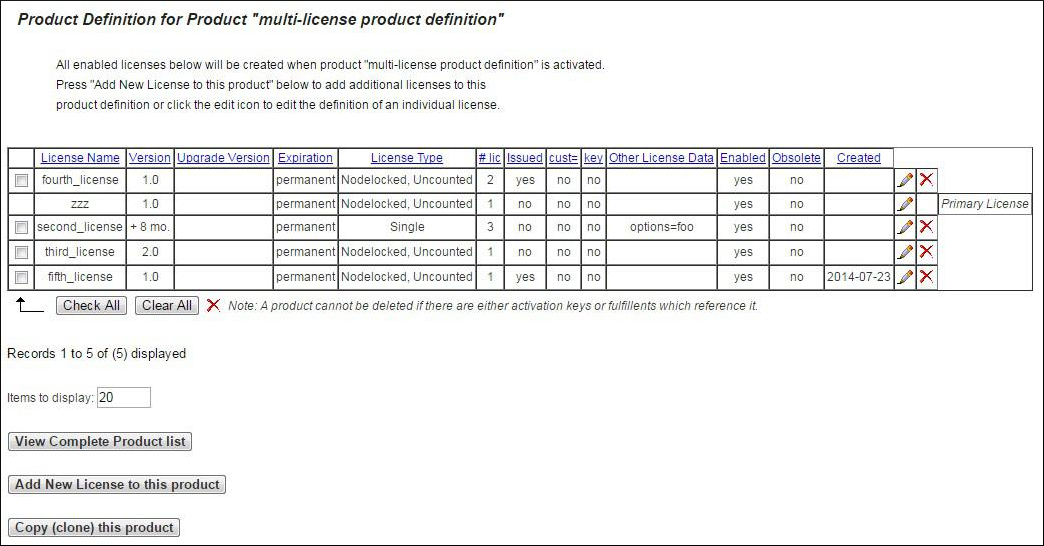
existing licenses. The browser looks like this:
In this example, the product “multi-license product definition” has 5 associated licenses. When this license is generated, all 5 of these licenses would be created. The primary license is the “zzz” license, and in addition, the “second_license”, “third_license”, “fourth_license” and “fifth_license” licenses would be created. This example contains an error: 2 of the licenses specify a “# lic” value that is not 1. Since these are nodelocked-type licenses, this value will be ignored by the license generator.
If you want to add an additional license to this product definition, click the Add New License to this product button at the bottom, and you will be presented with the Create Product screen. In addition, you can edit the data for any of the licenses by clicking on the edit icon on the right. You can also delete any of the non-primary licenses in this screen at any time.
To return to the full list of products, click the View Complete Product List button at the bottom.
If you would like to copy this product in order to create a similar one, press the Copy (clone) this product button at the bottom.
Profile Tab
Clicking on the “Profile” tab allows you to edit the email address associated with your account, or change your password.
Admin Tab
The admin tab, available to a user with “administrator” access, provides access to a second level of tabs to perform a number of administration functions. Each of these functions is described in the sections which follow.
Audit Trail
All create/edit/delete operations on product definitions, licenses, license servers, customer and contact data, and license fulfillments are recorded in the RLM Cloud Audit Trail. Each entry in the audit trail lists the time of the operation, who performed it, the operation (add/edit/delete), the database table and the key in that table.
The Audit Trail tab allows you to view the audit trail as well as clear old entries.
Database
The Database tab selects a page of various database-oriented operations. On this page, you can:
Upload your company logo (to display at the top of the screen).
Set the default server machine used when creating new servers (if you have more than one RLM Cloud server machine).
Bulk-load customer data.
Customize the customer data fields.
When you upload your logo, it will display in the middle of the top of the page, like the “Demo” logo here:
Note
The Set default server machine section will not appear if you only have one server machine.
Failover
The failover tab is described in detail in Failover Servers.
Options
The Options tab allows you to set:
Dashboard color thresholds
Server timeout
Options file edit lock time
Report Log Rotation Interval; # of days to save logs; auto-save of logs
Server Machines
The Server Machines tab allows you to upload and manage your server settings file and your generator settings file. In addition, you can re-create all your customer data on a server machine with this form.
The form is divided into 3 sections; generator settings and server settings in nearly identical sections at the top, and “refresh license data” on the bottom:
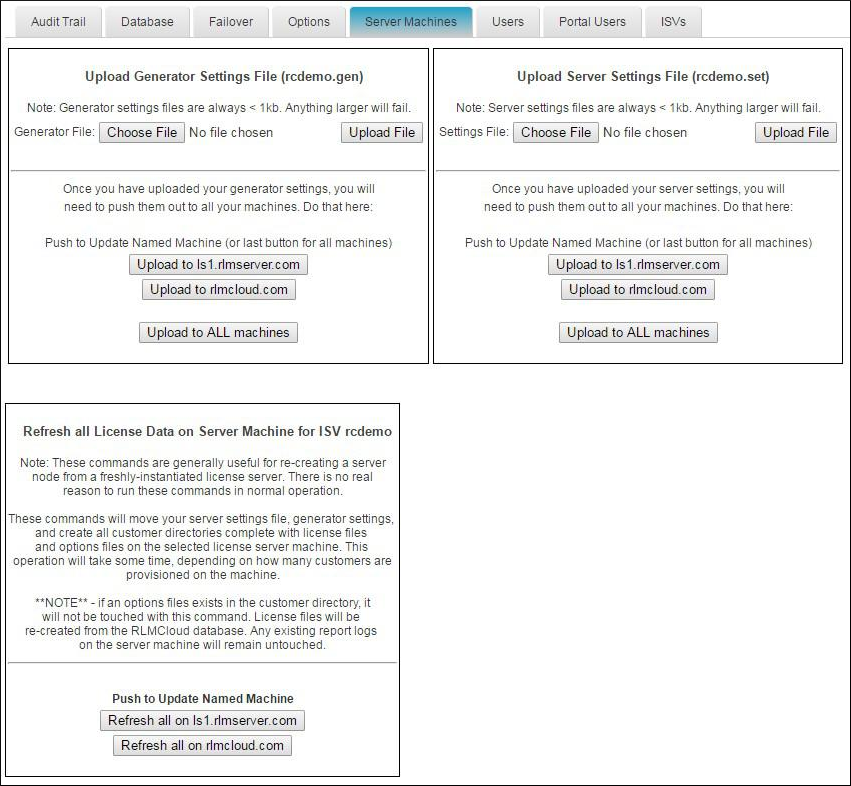
The RLM Cloud license generator is generic, and it is customized via a small settings file (similar to the ISV server settings file in RLM). This generator settings file, however, contains your company private key, so you need to be very careful with it. Before you can create licenses with RLM Cloud, you must upload the Generator Settings File to the website. To do this, click the Browse… button in the top-left-hand side of this form to locate your settings file, then press Upload File. Your generator settings file will be uploaded to the RLM Cloud website. Finally, push the generator settings file to your server machine(s) using the button at the bottom of the same section, under the heading Push to Update Named Machine.
Note
You create the generator settings file by running the command “rlmsign -gen” in your RLM kit.
RLM Cloud uses the generic license server settings file. Before you can start license servers with RLM Cloud, you must upload the Server Settings File to the website. To do this, click the Browse… button in the top-right-hand side of this form to locate your server settings file, then press Upload File. Your server settings file will be uploaded to the RLM Cloud website. Finally, push the settings file to your server machine(s) using the button at the bottom of the same section of the form, under the heading Push to Update Named Machine.
Note
You create the server settings file by running the command “rlmsign -gen” in your RLM kit.
You should never have to use the Refresh all license data on server machine… portion of the form. This is for disaster recovery only.
Users
The Users tab allows an administrator to view the list of authorized users, change their access permissions, delete users, and add new users.
Portal Users
Like the Users tab, the Portal Users tab allows an administrator to view the list of authorized portal users, change their access permissions, delete users, and add new users.
About Tab
Clicking on the “About” tab displays a screen of information about this RLM Cloud installation. In addition, there is a link to the RLM Cloud Manual on this page. (see next page)