Other RLC Commands
Once you have set up a product definition and an activation key, you can begin using Activation Pro, as soon as you upload your license generator settings file and your Activation Pro license, as described in the sections below. There are, however, a number of other RLC commands in the “Fulfillments”, “Customers”, “Reports”, “Admin”, “Profile”, and “About” tabs which will be useful in the day-to-day operation of the system, so you will want to become familiar with them before you enable Activation Pro for your customers.
Fulfillments
The Fulfillments tab allows you to view the licenses which have been created by Activation Pro. In addition, you can delete an individual fulfillment, in order to re-enable the count consumed on that activation key by that particular fulfillment. This is helpful when you are testing the activation software and you want to be able to regenerate a license for a particular hostid, since a re-activation from the same hostid would return the old license. By deleting the old fulfillment, the activation software will generate a new license (with a new expiration date) for that activation key on the hostid. The Expiration Date displayed in the browser will be the earliest expiration date for all licenses in the case of a multiple-license product definition.
The left-hand box at the top shows the number of (net) fulfillments – these are the current fulfillments (i.e., current usable licenses) after taking revoked licenses into account. The second box shows the number of revoked licenses.
The “Last Check” column indicates the last time rlm_act_keyvalid() was called on this activation key/hostid combination. (This column is new in ActPro v11.2BL2).
The “Company” and “notes” from the activation key were added in ActPro v12.2.
As in all the lists, you can filter the list using the Select: box at the top:

To delete the fulfillment, click on the red X at the right-hand side. Alternately, at the bottom of the list there are 2 buttons (“Check All” and “Clear All”), and a red X. Every fulfillment which can be deleted (i.e., fulfillments with the red X on the right-hand side of the list) will have a checkbox on the left. If you would like to delete multiple fulfillments in a single operation, check the boxes corresponding to these fulfillments then click the red X at the bottom of the form.
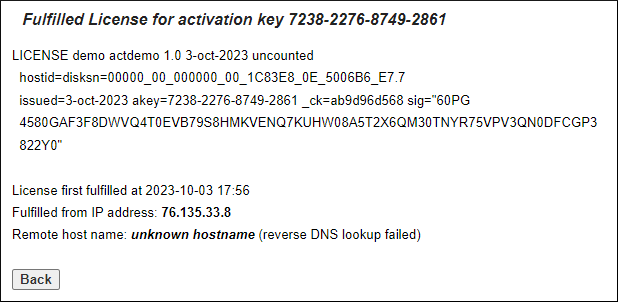
To view the fulfillment, click on the list icon  on the right. Clicking the list icon displays
the fullfillment data:
on the right. Clicking the list icon displays
the fullfillment data:
Customer List
RLM Activation Pro allows you to maintain a customer list and associate customers with activation keys.
You manage customers by selecting the “Customers” tab.
Editing Customer Information
You can edit individual contacts with the edit button  on the right. If the contact is not
associated with any activation key, pressing the delete button will confirm that you want to delete
the contact. If you delete the last contact for a company, you will be prompted to delete the
company record itself.
on the right. If the contact is not
associated with any activation key, pressing the delete button will confirm that you want to delete
the contact. If you delete the last contact for a company, you will be prompted to delete the
company record itself.
Merging Customers
If you have 2 contacts who represent the same person, or 2 companies which are the same, you can check the checkboxes at the beginning of the 2 lines, then press Merge Contacts or Merge Companies, as appropriate. You must select exactly 2 customers for the merge operation. Once you press the Merge… button, you will be prompted to select which of the 2 should remain after the merge operation.
A merge of contacts will update any activation key or user record which referred to the old contact to then refer to the new (surviving) contact. For a merge of companies, any contact associated with the old company will now be associated with the surviving company.
Once the merge is complete, in the case of Merge Companies, the other company will be deleted, and all data associated contained in company record will be lost. For the case of contacts, you will be prompted as to whether you want to delete the contact or not. If you delete it, all information in that contact record will be lost.
Starting in Activation Pro v14.0, if a small number of customers are displayed in the customer tab, their activation keys will be displayed at the bottom of the form as well. The number of customers is set to 5 by default, but can be changed in the Admin → Database tab. You may see duplicate activation keys in this list if multiple contacts for the same company appear in the customer list.
Creating new Customers
To create a new contact/customer, press the Add Customer button at the top or bottom of the screen, the “Add New Customer” form appears:

You add the company first, then add contact people for that company. You are not required to add company information for contacts if you prefer to have only the person’s name and other info from the Contact Person Info side of the form, however, the Activation Pro customer portal operates using Company Information, so if you plan to allow your customers access to the portal, you should add company names along with your contacts.
Once you have added some Contacts to the system, you can assign them to activation keys.
Starting in ActPro v12.5,the Portal account sub-form appears at the bottom right-hand side. This allows you to create a portal account for the contact without going to the Admin → Users tab. When you edit this contact, you can change their password in the form, also.
Reports
Activation Pro has a report generator, which you access via the “Reports” tab. The report generator is described in detail in Reporting.
Admin
The admin tab, available to a user with “admin” access, provides access to a second level of tabs to perform a number of administration functions. Each of these functions is described in the sections which follow.
ActPro License
The license generator in Activation Pro requires a license from Reprise Software to operate. When you purchase Activation Pro, Reprise sends this license to you. To install the license, select the ActPro License tab, click the Browse… button to locate your license file, then press Upload File. Your license file will be uploaded to the website.
Audit Trail
All create/edit/delete operations on product definitions, activation keys, customer and contact data, as well as deletions of banned hosts and license fulfillments are recorded in the ActPro Audit Trail. Each entry in the audit trail lists the time of the operation, who performed it, the operation (add/edit/delete), the database table and the key in that table. The Audit Trail tab allows you to view the audit trail as well as clear old entries.
Banned List
RLM Activation allows you to specify a list of unauthorized domains - domains which cannot activate licenses. If you select the Banned List tab in the Admin tab area, you will see a list of banned domains. The last item in the list is blank and allows you to add a new domain. In addition, each domain in the list has a Delete button on the right to remove it from the list.
The banned list is a list of domain names which are not allowed to activate using this activation key. If a request comes in from any domain on this list, it is rejected with RLM_ACT_BLACKLISTED. Note that if any string you enter here is a substring of the domain name then that domain will be rejected. All names are case-insensitive, and each item in the list must be less than RLM_MAX_HOSTNAME (64) bytes.
The license generator automatically bans IP addresses which attempt a large number of incorrect activation keys. These IP addresses will appear in normal IP address format (a.b.c.d), rather than as domain names, and an exact IP address match is required to ban the address, rather than the substring match that happens with manually-banned domain names. When you are manually entering banned domains, do not enter them in IP address format. You can delete any automatically-banned IP address in this list by pressing the delete icon on the right-hand side of the list. For more information on the automatic banning of IP address see Automatically Banning IP addresses.
Database Tab
The Database tab selects a page of various database-oriented operations. On this page, you can:
Backup your database
Restore a previously-backed-up database (or just a part of a database)
Perform a consistency check on the database
Purge activation statistics
Edit product definition defaults, activation key defaults, and ISV port # default
Control whether revoked expired rehostable hostids return count to the activation key
Set the automatic ban list parameters
Allow expired licenses to be revoked
Bulk-load customer data, and customize the customer data fields
Set the activation server URL
Set the license generator URL for fulfillments (new in v14.2)
Delete activation keys which have previously been revoked from a rehostable hostid. (These keys cannot be deleted in the normal Activation Keys tab.)
Normalize the dates in the database
Specify the processing of “misc” license fields
Blank (do not record) the IP addresses of successful activations
Specify the maximum # of customers displayed in the customer browser that results in activation keys being displayed as well.
Upload your logo to be used on the Activation Pro pages
Specify the local timezone for time display (hostedactivation.com only)
Note that the Specification of database fields which are not saved option allows you to not record IP addresses of client machines which activate licenses. This is believed by some companies to be required for GDPR compliance. Even if this option is set, the IP addresses of failed activations are still recorded to enable the auto-banning of malicious systems, it is just the IP addresses of successful activations which are not recorded.
The Upload your LOGO option allows you to upload a logo that will replace the Reprise logo at the top of each page, for both regular and portal users. Select a file containing your logo (GIF or JPG format, max size of 120x100 pixels), then press the Upload Your Logo button. Activation Pro will now display your logo in place of the Reprise logo at the top of each page, for both regular and portal users.
In addition, on hostedactivation.com only, you have the options to Set Actpro Timezone. This command will re-write your entire licf (fulfilled licenses) table, so it can take a while. Reprise has approx 2500 fulfilled licenses in our database, and the command executes nearly instantaneously.
Debugging Tab
The Activation Pro license generator can write debug log information to the database. This is disabled by default, since the amount of data can become quite large, and it’s generally only useful for diagnosing particular activation-related problems. Selecting the Debugging tab displays a page with 4 buttons: View Debug Log, Enable Debug Logging, Disable Debug Logging, and Clear Debuglog If you are experiencing a problem with activations, you can go to this page, enable the debug logging, then re-try the activation and view the debug log. In addition, you can select (filter) the debug log using the Select box on the View Debug Log line. You can chose whether the debuglog is displayed in chronological or reverse chronological order.
While viewing the debug log, you can clear the log, and refresh the log while on the page.
In ActPro v15.0, the debug log displays the PID of the license generator process which generated the messages. The list will be sorted by PID, so that when there are multiple activations happening simultaneously, the debug output from each activation stream can be identified.
Delete Fulfillments Tab
The Delete Fulfillments tab, new in ActPro v12.4, allows you to purge old fulfillments which have expired. This is most useful for subscription-type activation keys. USE THIS WITH CAUTION. If you use normal activation keys, for example, deleting the old fulfillments will allow your customer to re-activate the license with a new expiration date if the activation key itself has not expired. It is generally MUCH SAFER to select the fulfillments you want to delete in the fulfillments browser, and delete them that way.
Generator Settings Tab
The RLM Activation Pro license generator is generic, and it is customized via a small settings file (similar to the ISV server settings file in RLM). This generator settings file, however, contains your company private key, so you need to be very careful with it. Before you can create licenses with Activation Pro, you need to upload the Generator Settings File to the website. To do this, select the Generator Settings tab, click the Browse… button to locate your settings file, then press Upload File. Your generator settings file will be uploaded to the website.
This tab also allows you to control whether requests to the activation server must be encrypted or not. Prior to ActPro v12.0, requests could be encrypted or unencrypted. The RLM web interface, for example, uses unencrypted requests, as does any web page you set up to do activation, whereas the rlm_activate() and rlm_act_request() calls always encrypt the request. The disadvantage of allowing an unencrypted request is that any user can set up a web page to access your activation server and pass data which you might not want to allow (such as values for optional RLM parameters.) ActPro v12 defaults to allowing unencrypted requests, but if you use optional parameters, you might want to turn these off.
Online/Offline Tab
The Online/Offline tab allows you to put your license generator online for normal operations, or offline if you want to perform database maintenance without customer activations making changes to the database. This tab brings up a form with a radio button to set your license generator online or offline. Be careful about setting your generator offline. The state of your license generator appears in the About tab for reference.
Resellers
The Resellers tab allows you to specify which fields in an activation key a reseller is allowed to edit. See Reseller Support for more information about this tab.
Users
The Users tab allows an administrator to view the list of authorized users, add new users, delete users, and edit an existing user.
At the bottom of the form is a list of checkboxes labeled Visible Tabs. By default, they are all checked. If you want to make a particular tab disappear for a user, uncheck the checkbox next to the tab name. For example, if you uncheck the Profile checkbox, the tab will not appear for this user, which means that the user cannot change their password or set defaults for product definitions or activation keys.
Note
The Admin and About tabs cannot be hidden.
Profile
Clicking on the Profile tab allows you to edit the email address associated with your account, or change your password.
About
Clicking on the About tab displays a screen of information about this Activation Pro installation, including the expiration date of your Activation Pro license (The expiration date is updated by the license generator, so if the license generator has never run, this information will not appear. Also, the date won’t be updated when you install a new license until the license generator runs again).
In addition, there is a link to the RLM Activation Pro Manual on this page.