Getting Started
When your RLM Cloud account is provisioned by Reprise, you will receive login credentials to log into your administrator account for RLM Cloud. The RLM Cloud software is accessed at:
The first thing you should do is create one or two new account logins for the various user roles you plan to utilize.
User Roles
Users are assigned to the following privileges, depending on their role within the system:
View – This user can view all license server status and licenses, but perform no control operations.
Manage – “View” permissions + this user can start and stop servers.
Edit – “Manage” permissions + this user can create new product definitions, customers and license servers.
Administrator – This user can perform all operations on RLM Cloud.
When your RLM Cloud system is provisioned by Reprise, you will receive a username and password for an admin account. Use this account to do the initial setup, but normally, you should run RLM Cloud from an account with Manage, Edit or View privileges.
First Steps
Get started using RLM Cloud with the following 6 steps. Steps 1-3 must be done as an administrator user, the remaining steps can be done by a user with edit privileges.
1. Create an “Edit” User (optional)
While it is possible to do everything in RLM Cloud using an administrator account, if multiple individuals are going to be using the system, Reprise recommends that you set up, at a minimum, at least one Edit user to perform the setup of license product definitions. You will want a Manage user who will deal with the day-to-day provisioning and control of your customer’s license servers. In addition, you may want to create a View user at this point. Select the Admin → Users tab, then press Create New User, and fill in the form. If you are the only user, you can certainly skip this step and do all your operations as an administrator user.
2. Upload Your License Server Settings
RLM Cloud needs a copy of your license server settings file. Upload this now. Select the Admin tab, then on the next line of tabs, the Server Machines tab. On the top-right-hand section of the form, browse and select your license server settings file (<isvname>.set). Next, push the settings file to your server using the button at the bottom of the same section of the form, under the heading Push to Update Named Machine. (You create your server settings file by running “rlmsign -set” in your RLM kit.)
3. Upload your license generator settings
Since RLM Cloud will create licenses for your customers, it needs access to a license generator. Upload this now. In the Server Machines tab, browse and select your license generator settings file (<isvname>.gen) in the top-left-hand side of the form. Next, push the generator settings file to your server using the button at the bottom of the same section, under the heading Push to Update Named Machine. (You create your generator settings file by running “rlmsign -gen” in your RLM kit.)
4. Create Product Definitions
At this point, you can log out of the admin account and log in as the “Edit” user, if desired. When you provision a customer in RLM Cloud, you will add a number of licenses for that customer. In order to do this, you first create product definitions, which define how the product licenses are created. If you have used RLM Activation Pro, the product definitions are very similar (they are somewhat simpler in RLM Cloud). At this point, you should create at least one Product Definition before you continue. Select the Products tab, and press Add New Product, and fill in the form and save it. Details on how to create product definitions are in the Products Tab section.
5. Provision Your First Customer
Every RLM Cloud account includes one license server host - more license server hosts are available as an option. This host is ready for you to use, and customers can be provisioned for use by a user with “Edit” or “Administrator” privilege.
Once you have completed steps 1-4, you can provision your first customer in RLM Cloud. To do this, first select the Customer tab. If you have customers already defined, you will see a list of them here. If you don’t, there is an Add Customer button. Press this now. You will need to fill in the company information on the left-hand side of the form – company name and abbreviation are required, the remaining information is optional. Once you have entered this, press Add Company Info at the bottom of the form.
You can also add contacts to this company, but this is not required. RLM Cloud will create an empty [none] contact when you add the company. You can delete this contact once you add any other contacts, or leave it if you don’t wish to enter any contacts.
Your customer is now on the list of customers, but you will note that it has no provisioned servers yet. (If a customer has no provisioned servers, there will be a red “X” in the Delete column, indicating that this customer contact can be deleted, as shown below). Note that in this example, we did not create a contact for “Acme Software”, but we did create one for “Widget Corp”:

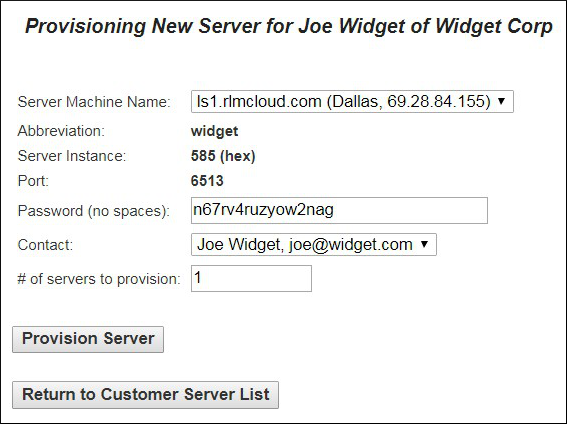
Press the Servers icon (☼), and a blank list of servers will be displayed. On this screen, you can press the Provision New Server Instance for … button to provision a license server instance for this customer. Once pressed, the provisioning screen will be displayed and allow you to select a license server machine (there will only be one to select if you have not added additional license server machines), as well as a password for the server instance, and the particular company contact to associate with this server. The provision screen is shown here:
Once your customer is added and provisioned, you will need to add licenses. Press the Config icon on the right-hand side of the server list, and the server information for this customer will be displayed, as shown here:
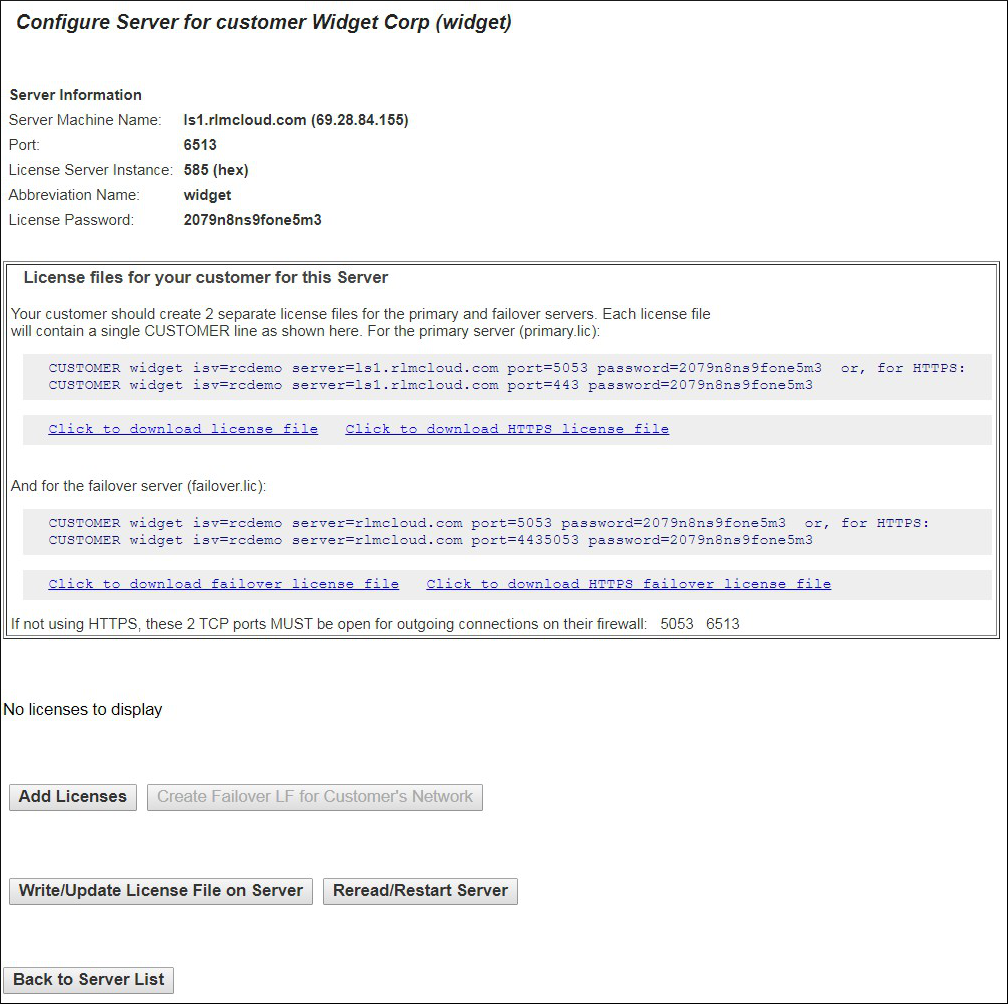
There are several things to note about this form:
The top of the form displays information about the server machine and server process.
The license file your customer needs to use is displayed in a box at the center of the form (in this case, RLM Cloud is configured for failover servers and there are 2 license files, one for the primary and one for the failover. See Failover Servers for more information.)
The ports that must be open on your customer’s firewall are also shown in this same box. These ports must be open for outbound connections, not inbound.
Below the box, the licenses on this server are displayed. This particular server (one of our test servers) is serving licenses for “man” and “gcc”, “named”, and “vi-metered” for the ISV “rcdemo”.
If you press the Add License(s) button, the license creation screen will be displayed, as shown here:
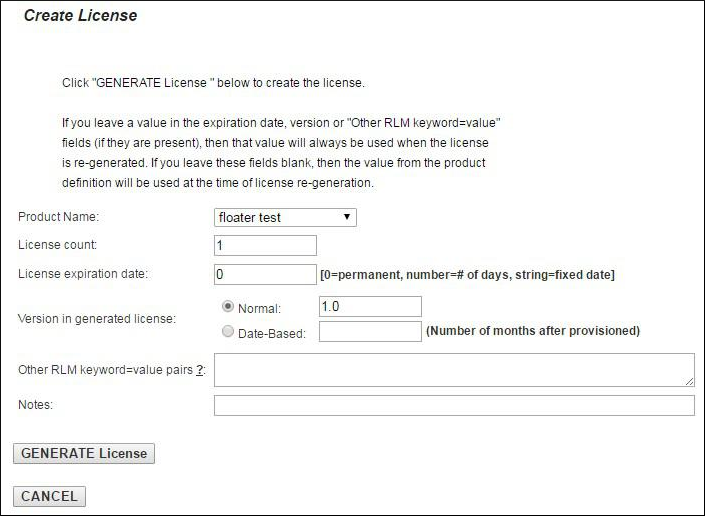
You can select a product from the drop-down list at the top, then fill in the license count, etc. Press Generate License at the bottom, then BACK on the confirm screen to re-display the server configuration screen.
When you have created all the licenses you want for this customer, press Write/Update License File on Server. This will cause RLM Cloud to sign the licenses and install on the specified server machine. RLM Cloud will display the server’s license file, as well as the updated RLM redirector configuration file for this machine.
6. Start the Customer’s Server
All that remains to be done is to start or reread the license server. You do this by using the Dashboard tab. (Once the server has been started for the first time, you can use the Reread/Restart Server button on the configure server page or the Dashboard tab.) Select the Dashboard and click the Reread/Restart button on the line “RLM + all ISV Servers on <your server machine name>:”. At this point, the new server should be running and your customer can run your software and check out licenses. You may need to press the Refresh this page button at the bottom of the form to update the server status. See the Customers Tab section and the Dashboard Tab section for details.