Using RLM Cloud
Since you are using a demonstration version of RLM Cloud, there is very little setup to do – we have done most of that work for you! We have created a demo kit and pre-configured the demo.set, demo.gen files, as well as a small test program (rlmclient) for Windows and Linux. So you don’t even need to compile or link anything to try RLM Cloud.
The welcome email you received contains the login information to the RLM Cloud system.
Note
The RLM Cloud demo database is reset every sunday night/monday morning at 3:10AM PST. So any changes you make will only remain during the course of a week. The good news is that it’s easy to get started. Follow these steps:
Download the sample rlmclient binaries. These can be found in the RLM developer kits here: https://reprisesoftware.com/support/publishers/developer-kits-for-software-publishers/
If you do not already have an account on our website, you will need to create one to access the downloads page.
Log in to the RLM Cloud system using the credentials you received from your Reprise Salesperson. These credentials will be for an admin user, which is the highest level of privilege available in RLM Cloud. You can create other users with less privileges, but for the purposes of this demo, we will do everything as an admin user.
Your RLM Cloud username/password is in the email you received.
In RLM Cloud, do the following:
Create Product Definitions
When you provision a customer in RLM Cloud, you will add a number of licenses for that customer. In order to do this, you first create product definitions, which define how the product licenses are created. If you have used RLM Activation Pro, the product definitions are very similar (they are somewhat simpler in RLM Cloud). At this point, you should create at least one Product Definition before you continue. Select the Products tab, and press Add New Product, and fill in the form and save it. If at any point you get stuck, the RLM Cloud manual is available via a link in the About tab.
Provision your first customer
The RLM Cloud demo account includes one license server virtual machine (VM) - more license server machines are available as an option when you purchase RLM Cloud. This VM is ready for you to use.
You should now provision your first customer in RLM Cloud. To do this, first select the Customer tab. There is an Add Customer button - press this now. You will need to fill in the company information on the left-hand side of the form – company name and abbreviation are required, the remaining information is optional. Once you have entered this, press Add Company Info at the bottom of the form.
You can also add contacts to this company, but this is not required. RLM Cloud will create an empty [none] contact when you add the company. You can delete this contact once you add any other contacts, or leave it if you don’t wish to enter any contacts.
Your customer is now on the list of customers, but you will note that it has no provisioned servers yet. (If a customer has no provisioned servers, there will be a red X in the Delete column, indicating that this customer contact can be deleted, as shown below). Note that in this example, we did not create a contact for “Acme Software”, but we did create one for “Widget Corp”:

Press the ☼ icon in the Servers column, and a blank list of servers will be displayed. On this screen, you can press the Provision New Server Instance for … button to provision a license server instance for this customer. Once pressed, the provisioning screen will be displayed and allow you to select a license server machine (there will only be one to select), as well as a password for the server instance, and the particular company contact to associate with this server. The provision screen is shown here:
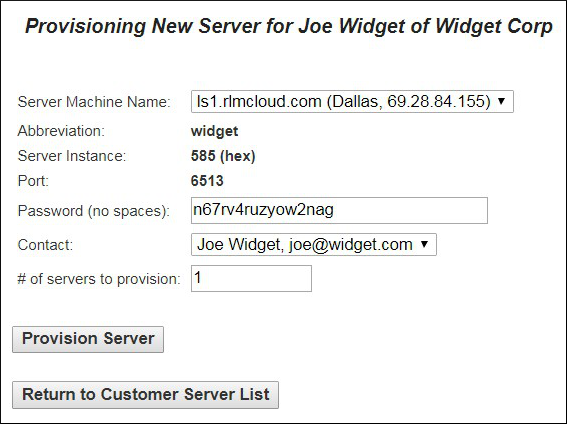
Press Provision Server, and the license server will be provisioned.
Once your customer is added and provisioned, you will need to add licenses. Press Return to Customer Server List, then the Config icon on the right-hand side of the server you just provisioned, and the server information for this customer will be displayed, as shown here:
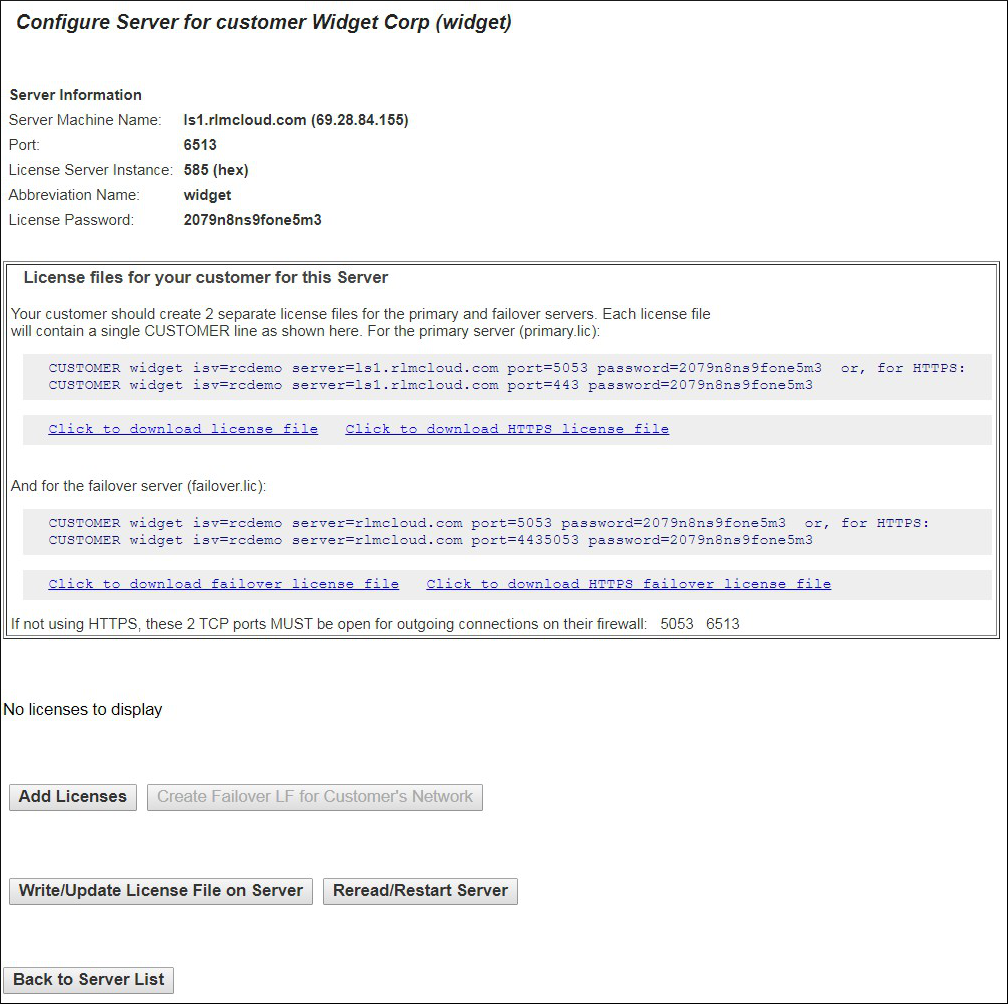
There are several things to note about this form:
The top of the form displays information about the server machine and server process.
The license file your customer needs to use is displayed in a box at the center of the form. Starting with RLM v14.0, your application can access the license server either using the normal RLM comm protocol, or using HTTPS. If you want to use HTTPS, you must build HTTPS support into your application. See Using RLM with HTTPS.
If you use the normal RLM comm protocol, the ports that must be open on your customer’s firewall are also shown in this same box
Below the box, the licenses on this server are displayed. This particular server does not yet have any licenses provisioned.
This server is configured with a failover license server. In the demo system, you will not see the bottom part of the box with the failover license server information.
If you press the Add License(s) button, the license creation screen will be displayed, as shown here:
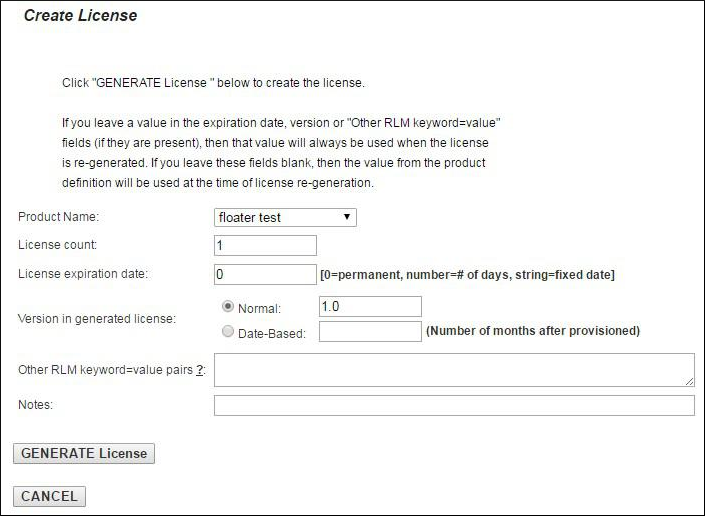
You can select a product from the dropdown list at the top, then fill in the license count, etc. Press Generate License at the bottom, then BACK on the confirm screen to redisplay the server configuration screen.
When you have created all the licenses you want for this customer, press Write/Update License File on Server. This will cause RLM Cloud to sign the licenses and install on the server machine. RLM Cloud will display the server’s license file, as well as the updated RLM redirector configuration file for this machine.
Start the customer’s server
All that remains to be done is to start or reread the license server. You do this by using the Dashboard tab. (Once the server has been started for the first time, you can use either the Reread/Restart Server button on the configure server page or the Dashboard tab.) Select the Dashboard tab. At the top of the page, select the Reread/Restart button on the line “RLM + all ISV Servers on <your server machine name>:”. At this point, the new server should be running and your customer can run your software and check out licenses. You may need to press the Refresh this page button at the bottom of the form to update the server status. See the RLM Cloud manual for more details.
Check out licenses
Now you are ready to check out licenses for this customer. To do this, put rlmclient into a directory. If you are on Windows this will be rlmclient.exe. Next, create a license file (named something.lic) that has one line in it that looks like this:
CUSTOMER <cust> isv=demo server=ls3.rlmcloud.com port=5053 password=<pw>
Replace <cust> with the customer abbreviation and <pw> with the server password you specified for that customer. In the example below, <cust> would be widget and <pw> would be 60u4iw0az7mullz, so the license line would look like this:
CUSTOMER widget isv=demo server=ls3.rlmcloud.com port=5053 password= 2079n8ns9fone5m3
Note
This is an example, and this exact customer line will not work.
Run “rlmclient product-name” (in a command window on Windows) and the license should be checked out.
Logs
You can view the server log files in the Logs tab.
Server Activity
You can view current server activity in the Dashboard.
Wrapping Up
At this point, you have:
Configured products
Added a customer
Provisioned a server for this customer
Added licenses to the server, and
Started the server so that it is ready for customer use.
This is the normal flow of operations in RLM Cloud, and this concludes the demo. The next chapter describes the RLM web services API, which you can use to check out licenses from RLM Cloud in languages that do not have C-API bindings.