Basic RLM Server Setup for Windows
If you have just purchased a piece of software that uses the Reprise License Manager (RLM), and you have never used RLM before, this guide will walk you through a basic setup of the license manager on the Windows operating system.
This is meant to be only a very basic guide to get you started; more detailed information on any of the items below can be found in the preceding manual. If you have any installation issues or questions, please contact your software publisher directly for support.
In the rest of this guide we will refer to the software publisher as the ISV (independent software vendor).
What You’ll Need
The RLM server
An ISV server
A license file
The RLM server may or may not be provided to you by your ISV, and will be called rlm.exe on Windows. If not provided by your ISV, downloads can be found here: https://reprisesoftware.com/support/admin/
The ISV server and license file must be provided by your ISV. The ISV server will be either a platform-independent settings file, called <isvname>.set, or a binary called <isvname>.exe on Windows. The license file may be a text file with the extension “.lic” (the format recommended by Reprise), but you will need to refer to the files supplied by your ISV to confirm.
Options File (optional)
If you would like to view historical usage information for the software you have purchased, you will also need an options file. Creating one is easy:
Create a new text file and rename it “<isvname>.opt” (New Text Document.txt → <isvname>.opt).
Open <isvname>.opt with Notepad and add a REPORTLOG line:
REPORTLOG +C:\\RLM\reportlog.log
Save and close the file.
For more information see The ISV Options File.
Installation
Create a folder that the license manager will run from. This can be called anything, but for the purpose of this guide we will name it \RLM and create it directly on the root of C: (C:\RLM). If you have downloaded a kit, or were given an archive (like .zip) from your ISV, extract this to the location you will install RLM.
Ensure that you have rlm.exe; your license file; and either <isvname>.set or <isvname>.exe in this folder.
Double-clicking the RLM executable will open a command prompt Window, and effectively start your license manager; however, this will need to be started manually every time Windows is restarted, or the command prompt is closed. It is recommended that you install RLM as a service.
Installing the Service
Open the start menu, type “cmd,” right-click “Command Prompt,” and select “Run as administrator.”
Use the cd command move to the installation directory. For example:
cd c:\rlm
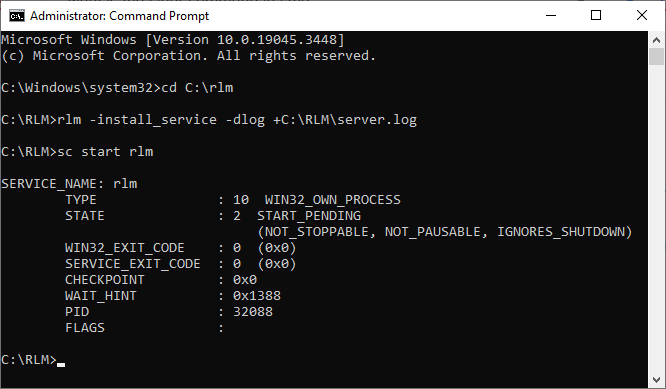
Now install the service. Note that the path for the log will need to match your installation directory.
rlm -install_service -dlog +C:\RLM\server.log
If successful you will be taken to a new line with no messages. Now start the service:
sc start rlm
You should now see a message containing various information related to the service, including “Start Pending.” You should now see “RLM” in your Windows Services.
For more information and additional installation parameters see RLM startup options.
Web Management Interface
The default installation includes a web administration interface that can be accessed through a browser to perform license administration tasks. This can be access using https://<server-hostname>:5054 or https://<server-IP>:5054 (for version 15.2 and below, this may be http only).
The default login and password for the web interface are:
Username: |
admin |
Password: |
admin |
The first time you login you will be prompted to change the password.
See The RLM Web Server.
Important Notes
RLM uses port 5053, as well as a port for your ISV that is dynamic by default. The ISV port can be set to a static port if you need to create a firewall rule. See: ISV Line.
The web interface uses port 5054. If the RLM server cannot bind to this port, it will exit. To access the interface outside of the server, clients will need to be able to communicate over this port.
Ports should be open TCP inbound on the server firewall.